The spores I've sown are of:
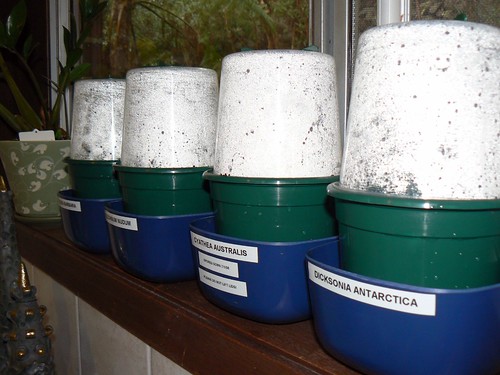
Dicksonia antarctica Soft Tree Fern, grows to 4.5 m high.
Cyathea australis Rough Tree Fern, grows to 20 m high.
Blechnum nudum Fishbone Water Fern, trunk to 1 m.
Todea barbara King Fern, trunk to 3 m, fronds to 2.5 m.
All are indigenous to my region. It's a long and tricky process to grow ferns from spores, and I've not succeeded in the past--probably because I let the medium dry out. If this lot make it, it'll be decades before they reach full size.
Here's the procedure:
- You can obtain spores by collecting fronds with well-developed sori, and place them face down on a sheet of paper in a place where draughts won't blow them away. The spores, which are are tiny and resemble fine dust, will fall out onto the paper over a few hours providing the sori are ripe.
- Sterilise all pots, lids and saucers (I've used bowls). You can do this with boiling water, but try to avoid getting them contaminated while they're drying. I used a clean tea towel to sit them on.
- Prepare your growing medium. I've used peat moss which I bought in a block and to which I added boiling water, to sterilise and hydrate it. You can also use sphagnam moss
- Add the growing medium to the pots, and cover as soon as possible. You don't want bacteria or spores from fungi contaminating the material. If you don't have propagation pots with lids like those above, you can cover the pots with glass or clear plastic film.
- Sit the pots into their saucers or bowls and water into saucer/bowl, partly submerging the pot.
- When the pots have cooled down, remove the lids one by one and sprinkle on the spores. Cover again immediately.
- Make sure that the medium doesn't dry out--keep your eye on the water levels!
 Image source: http://www.anbg.gov.au/ferns/fern.cycle.gif
Australian National Botanic Gardens.
Illustration by Murray Fagg ©
The spore germinates to form a prothallus, a green speck only a cell thick in places, on the surface of the medium. It contains both male and female sex organs, and the male sperm fertilises the female egg and the new fern then grows out of the prothallus.
- While the prothallus develops over the next 6 to 12 months, it's important not to allow any contamination to occur, so continue to water from below.
- Once the ferns (fernlings?) emerge, you can start watering from above, using a mister or fine water sprayer. Again, only remove the lid briefly.
- When a few fronds have appeared, you can prick the ferns out to avoid overcrowding, moving them into more pots and slowly hardening them off by gradually exposing them to the air. Keep them out of direct sunlight.